- Make linux sd-card (Pi Os Lite 64) with "Pi imager"
https://www.raspberrypi.com/software/ - Enable WIFI connection with raspi-config
- Make update
sudo apt update -y && apt upgrade -y - Install Pico-8 to Linux ~dir (i am used SSH SCP)
- Instal Pico-8 linux dependencies
sudo apt install libsdl2-dev pulseaudio libsdl2-2.0-0 -y - Make Pico-8 run script like
cat pico-8/startpico8.sh
echo "Starting PICO-8..."
sleep 3
/home/pi/pico-8/pico8_64 -splore - Make script executable
sudo chmod +x startpico8.sh - Add script to .bashrc at end of file
./pico-8/startpico8.sh
for autostart after boot - Use raspi-config for:
autologin with pi user
audio to HDMI output
воскресенье, 16 февраля 2025 г.
Pico-8 consolizing on Rpi-3 (Raspberry pi 3)

пятница, 1 ноября 2024 г.
воскресенье, 8 сентября 2024 г.
Canon LBP 2900 and Windows 10 install
1) Enable old SMB v1
Press WIN+R and print appwiz.cpl


2) Add printer

3)
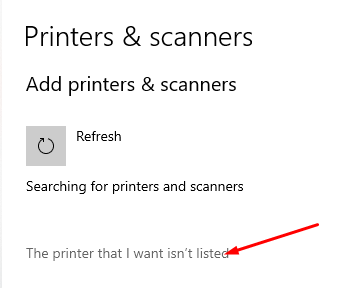

enter \\10.10.10.16

четверг, 8 августа 2024 г.
steamdeck and astroneer

1) add string to steamdeck
/home/deck/.local/share/Steam/steamapps/compatdata/361420/pfx/drive_c/users/steamuser/AppData/Local/Astro/Saved/Config/WindowsNoEditor/Engine.ini
[SystemSettings]
net.AllowEncryption=False
2) add string to astroneer server
E:\steamcmd\steamapps\common\ASTRONEER Dedicated Server\Astro\Saved\Config\WindowsServer\Engine.ini
[SystemSettings]
net.AllowEncryption=False
3) restart server4) dont forget open 7777 UDP on server host for all
суббота, 4 мая 2024 г.


среда, 27 марта 2024 г.
zx-uno c64 keys for VGA output
This is a very important key Scroll Lock key, because the system ZX-UNO and C64 core by default use
composite video out and you will not be able to see a picture if use VGA output.!!!
Original article:

Entre las características que se presentan para esta nueva implementación encontramos:
– C64 PAL con 64K de RAM
– Impmentación de disquetera 1541 completa, redirigida a SD (de momento solo SD, no SDHC, y en RAW). Sólo lectura.
– JiffyDOS opcional tanto para la 1541 como para el C64. Esto acelera muy notablemente las cargas.
– Chip de sonido SID
– Soporte de joystick, tanto real (norma Atari, SMS, megadrive…) como emulado en pad numérico
– Switch Video compuesto/RGB – VGA 50Hz (tecla Bloq Desp. / Scroll Lock)
– Reset (F12)
– Master Reset (ctrl+alt+backspace)
– LED testigo de lectura de la disquetera 1541
https://www.commodorespain.es/nuevo-core-para-el-zx-uno-commodore-64/
-------------------------------------------------------------------
Translated:
Among the features presented for this new implementation we find:
– C64 PAL with 64K RAM
– Complete 1541 floppy drive implementation, redirected to SD (at the moment only SD, not SDHC, and in RAW). Read only.
– JiffyDOS optional for both the 1541 and C64. This speeds up loading very noticeably.
– SID sound chip
– Joystick support, both real (Atari standard, SMS, megadrive…) and emulated on a numeric pad
– Composite/RGB Video Switch – VGA 50Hz (Scroll Lock key)
– Reset (F12)
– Master Reset (ctrl+alt+backspace)
– Floppy drive reading indicator LED 1541
воскресенье, 8 января 2023 г.
Steam deck - SSD Upgrade - Steam Os fresh install from usb
You have a new SSD drive and want to upgrade steam deck (SD), you must do:
1) install new SSD drive to SD and get out old SSD or emmc drive (64GB)
Be careful with SD plastic case, its very fragile. You better start disassembling the case from the top side.


2) Download Stem OS SD special image
3) Burn image to USB drive with rufus - change MBR boot type

https://youtu.be/6vFmOf4V6O4
4) Power on SD holding (-) volume down key to boot into bios mode and choose boot manager - then choose USB drive
5) Boot from usb and choose "rewrite image" script icon
6) Unplug USB drive and reboot
среда, 9 февраля 2022 г.
hepgen.js hep data generator
hebgen.was - a very useful tool for testing such systems as Sipcapture Homer application (heplify service)
1) install node.js
apk add --update nodejs npm (for alpine linux)
2) install hepgen.js tool
npm install -g hepgen.js
3) download js template for HEP generation from
https://github.com/sipcapture/hepgen.js/find/master
4) run HEP generator and send to socket
hepgen.js -s 127.0.0.1 -p 9060 -c "./config/b2bcall_rtcp.js" - for UDP!!!!!!!!
hepgen.js -s 192.168.27.71 -p 30961 -t tcp -c "./config/b2bcall_rtcp.js" - for TCP!!!!!!!
вторник, 24 августа 2021 г.
freeswitch links ln lua and configs
ln -s /cluster/conf/freeswitch/ /usr/local/freeswitch/etc/
ln -s /cluster/conf/freeswitch/scripts/ /usr/local/freeswitch/share/freeswitch/
среда, 16 июня 2021 г.
freeswitch rtcp enable
for session:
<action application="set" data="rtcp_audio_interval_msec=5000"/>
for profille:
<param name="rtcp-audio-interval-msec" value="5000"/>
<param name="rtcp-video-interval-msec" value="5000"/>
четверг, 6 мая 2021 г.
понедельник, 3 мая 2021 г.
пятница, 12 февраля 2021 г.
Debian apt-get, use cdrom or dvd-rom iso redhat
1) mount iso image
mount -o loop debian-10.8.0-amd64-DVD-1.iso /media/cdrom
2) add to /etc/apt/sources.list
deb [trusted=yes] file:/media/cdrom/ buster main contrib non-free
3) install or update samething
apt-get update
------------------------------------- redhat------------------------------
# mkdir -p  /mnt/disc
# mount -o loop RHEL7.9.iso /mnt/disc
If you use DVD media, you can mount like below.
# mkdir -p  /mnt/disc
# mount /dev/sr0  /mnt/disc
Copy the
media.repofile from the root of the mounted directory to/etc/yum.repos.d/and set the permissions to0644or another similar permissions set:# cp /mnt/disc/media.repo /etc/yum.repos.d/rhel7dvd.repo # chmod 644 /etc/yum.repos.d/rhel7dvd.repoEdit the new repo file, changing the
gpgcheck=0setting to1and adding the following 3 linesvi /etc/yum.repos.d/rhel7dvd.repo enabled=1 baseurl=file:///mnt/disc/ gpgkey=file:///etc/pki/rpm-gpg/RPM-GPG-KEY-redhat-releaseIn the end, the new repo file could look like the following
[InstallMedia]
name=DVD for Red Hat Enterprise Linux 7.9 Server
mediaid=1359576196.686790
metadata_expire=-1
gpgcheck=1
cost=500
enabled=1
baseurl=file:///mnt/disc/
gpgkey=file:///etc/pki/rpm-gpg/RPM-GPG-KEY-redhat-release
Clear the cache and check whether you can get the packages list from the DVD repo
# yum clean all
# yum repolist enabled
It should look like the following if no other repository is enabled.
To avoid any corruption its recommend to disable any non-RedHat repositories.# yum repolist enabled Loaded plugins: product-id, search-disabled-repos, subscription-manager This system is not registered to Red Hat Subscription Management. You can use subscription-manager to register. repo id repo name InstallMedia Red Hat Enterprise Linux 7.9 repolist: 5,229If no errors are returned, the following can be used to update:
# yum update
четверг, 29 октября 2020 г.
pocket chip flash tools on debian 10
New mrthod
https://github.com/Thore-Krug/Flash-CHIP
Activate FEL Mode with jumper GRD-FEL, connect micro-usb

4 Simple steps:
1) download CHIP-SDK, unpack
2) download CHIP-TOOLS, unpack to -- > CHIP-SDK
3) download firmware (example - stable-pocketchip-b126), unpack to --> CHIP-SDK
4) go to CHIP-TOOLS and run
.../setup_ubuntu1404.sh
then run
./chip-update-firmware.sh -L ../stable-pocketchip-b126/
----- issues --------------
In Debian 10 you need to install same packages, if got errors
apt install --yes android-tools-fastboot sunxi-tools u-boot-tools openjdk-11-jdk-headless unzip
apt-get install make pkg-config libusb-1.0-0-dev zlib1g-dev
cp /usr/include/libusb-1.0/libusb.h /usr/include/
----Same usefull links and info -----------------------
https://www.reddit.com/r/ChipCommunity/comments/htkasm/chip_flashing_guide_july_2020/
http://www.chip-community.org/index.php/Flash_from_command_line#Flashing_your_C.H.I.P._without_the_web_flasher
---------------------------
Chips types:
TC58TEG5DCLTA00 - 4GB flash chip
hynix - 8GB chip
---------------------------
https://github.com/SaltyCybernaut/PocketCHIP-flash-utils
https://github.com/Thore-Krug/Flash-CHIP
----------------------------------
FLASH VERIFICATION COMPLETE.
# # #
#########
### ###
# {#} #
### '%######
# #
### ###
########
# # #
CHIP is ready to roll!
пятница, 23 октября 2020 г.
Обновляем "корейского" корейца Kia Sorento 2016, (все корейские, американские KIA и Hyundai) для Android Auto! (Car Play)
Зачем обновлять ПО AVN (Audio Video Navigation) на "чисто корейском" авто, с корейской навигацией? Ведь там только карты корейского полуострова?
Ответ для многих, может быть не очевиден. С картами и навигацией обновляется и основное ПО ГУ(Головного Устройства), т.е. сам Android и его приложения. Вместе с тем в последних обновлениях появилась, интересная мне, функция Android Auto (Car Play для Iphone).
Android Auto позволяет использовать всю мощь вашего телефона в плане навигации и аудио, что оригинальное, довольно древнее железо ГУ, уже навряд ли сможет. Плюс звонки, голосовой ассистент, локализация, и тд.
Признаки оригинального корейского ПО из System Info, (префиксы прошивок) имеют
ST.UMNT.KOR
MICOM.ST.UMNT.KOR
ST4.KOR.KMC

Официальный дилер конечно же не стал заморачиваться с обновлением "чистокровного" корейца, поскольку этого просто нету в их служебных инструкциях.
Локализация и "кастомные" прошивки - это "стремный хакинг", с этим пока подождём, а вот обновить корейскую прошивку на корейскую - вполне безобидная операция. Ведь корейцам также нужны обновления как и машинам в США и Европе. И тут крутая KIA (Hyundai) предлагает любому своему клиенту свободно воспользоваться программой Navigation Updater !!!
https://update.kia.com/US/EN/navigationUpdate
Программа поможет выбрать ПО и свободно его скачать его в зависимости от модели вашего авто и региона! Качаем, используя гостевой доступ. Выбираем модель своего авто (KIA, Hyundai, Genesys)

отказываемся от регистрации

выбор языка

выбираем модель авто

Качаем обновление - записываем на SD-Card или USB. Теперь можем обновляться.

После обновления можем пользоваться Android Auto или Car Play и "родная" навигация уходит на второй план. (На телефоне обязательно должно присутствовать приложение Android Auto)

вторник, 28 июля 2020 г.
ssh logining log
1) vim /etc/bash.bashrc
Append to the end of that file:
export PROMPT_COMMAND='RETRN_VAL=$?;logger -p local6.debug "$(whoami) [$$]: $(history 1 | sed "s/^[ ]*[0-9]\+[ ]*//" ) [$RETRN_VAL]"'
2) Set up logging for "local6" with a new file:
vim /etc/rsyslog.d/bash.conf
And the contents...
local6.* /var/log/commands.log
3) Restart rsyslog:
sudo service rsyslog restart
среда, 22 июля 2020 г.
ps4 jailbreak
It is finally here my dudes!
Download
6.72 Firmware (MAKE SURE IT'S NAMED PS4UPDATE.PUP
Standard Firmware
https://psarchive.darksoftware.xyz/PS...
Recovery firmware
https://psarchive.darksoftware.xyz/PS...
DNS:
108.61.128.158
165.227.83.145
среда, 17 июня 2020 г.
ssh keys access with no password
SSH Client : 192.168.0.12 ( Fedora 21 )
Step 1: Create Authentication SSH-Keygen Keys on – (192.168.0.12)
[tecmint@tecmint.com ~]$ ssh-keygen -t rsa
Step 2: Create .ssh Directory on – 192.168.0.11
[tecmint@tecmint ~]$ ssh sheena@192.168.0.11 mkdir -p .ssh
Step 3: Upload Generated Public Keys to – 192.168.0.11
[tecmint@tecmint ~]$ cat .ssh/id_rsa.pub | ssh sheena@192.168.0.11 'cat >> .ssh/authorized_keys'
Step 4: Set Permissions on – 192.168.0.11
SSH Remote Host : 192.168.0.11 ( CentOS 7 )
[tecmint@tecmint ~]$ ssh sheena@192.168.0.11 "chmod 700 .ssh; chmod 640 .ssh/authorized_keys"
Step 5: Login from 192.168.0.12 to 192.168.0.11 Server without Password
[tecmint@tecmint ~]$ ssh sheena@192.168.0.11
пятница, 12 июня 2020 г.
awk make lower or upper case register
1) Make script
#!/bin/bash
2) make it executable
chmod +x make_low.sh
3) use
./make_low.sh ASDASDASD
asdasdasd
#!/bin/bash
echo "$1" | awk '{print tolower($0)}'
echo "$1" | awk '{print toupper($0)}'
2) make it executable
chmod +x make_low.sh
3) use
./make_low.sh ASDASDASD
asdasdasd
воскресенье, 22 марта 2020 г.
apache2 python wsgi install compile
1) wget https://github.com/GrahamDumpleton/mod_wsgi/archive/4.7.1.tar.gz
2) apt update
3) apt install apache2-dev
4) ./configure --with-apxs=/usr/bin/apxs --with-python=/usr/bin/python3.5
5) make
6) make install
7) ls /etc/apache2/mods-enabled/wsgi.conf
ls /etc/apache2/mods-enabled/wsgi.load
ls -al /usr/lib/apache2/modules/mod_wsgi.so
2) apt update
3) apt install apache2-dev
4) ./configure --with-apxs=/usr/bin/apxs --with-python=/usr/bin/python3.5
5) make
6) make install
7) ls /etc/apache2/mods-enabled/wsgi.conf
ls /etc/apache2/mods-enabled/wsgi.load
ls -al /usr/lib/apache2/modules/mod_wsgi.so
8) service apache2 start
Подписаться на:
Сообщения (Atom)